
Step 1: Enroute to the Venue
You’re enroute to a venue to set up your Twinstant Mobile for the first time - and you have the following items in the back of your car:
- Twinstant Mobile Full Body 3D Scanner (17 poles, top+bottom rings, additional hardware)
- Capture Laptop and Mission Control Electronics (cabling, power controllers)
- Assembly Kit (tools)
- Spare Parts Box (in case something is damaged in transit)
Altogether, it took you about 15 minutes to load the car with all of the parts, carrying them one piece at a time from your place of business.
Reference: Twinstant Mobile Full-Body 3D Scanner (FAQ)

Step 2: Setting Up at the Venue
You’ve arrive at the venue, find your space, then proceed to unload your equipment from the car.
To protect parts in transit (and your back), you brought moving blankets and a furniture dolly, although lifting each individual piece of the system isn’t terribly hard, as the heaviest part is ~17lbs. Once unloaded, you proceed to set up the Twinstant Mobile in the 10′x10′ space you have previously reserved, following the instructions in the set-up video.
Altogether, it took you under an hour to unload the car, carry the parts to the setup location, and fully set up the system.
Reference: Scanning with the Twinstant Mobile (FAQ)
Step 3: Running a Test Scan
To ensure that your customers will have a smooth experience - and to ensure your system is prepared to provide the best possible quality scans it can, you boot the Capture Laptop, open the Twinstant Manager interface, and run a few test scans to ensure that there are no problems with the location you’re at.
Because the Twinstant Mobile has its own automated color calibration and you have decent lighting at this venue, there is no need to adjust any color or shutter settings - or focus any cameras, as all of those things are taken care of by the software.
After running the scans, you realize that you haven’t yet set up your internet connection - so the scans you ran were taken in “offline mode” and will need to be synced with the Twindom Cloud.
Step 4: Offline Mode to Online

At this event, you are using an LTE mobile hotspot for internet access, so you connect your hotspot and ensure that the internet is functional. Once the internet is functional, you run the “Cloud Sync” tool to sync the test scans you just ran with the Twindom Cloud and start processing the 3D preview models (as they were taken before the internet was connected). If your hotspot were to fail, you would continue running scans offline and would run the “Cloud Sync” tool when you got back to the office and had a more reliable internet connection. Now that you’re online, though, your scans will automatically upload the preview files when you submit them.
Each preview photoset takes ~15mb to upload, so with your 3GB of data from your plan, you could upload 200 scans before needing more data. Also, your LTE hotspot’s connection has an approximately 5mbps upload speed - the minimum Twindom recommends, so you know that the preview photoset uploads will go a little bit slow, but should still finish in 2-3 minutes each.
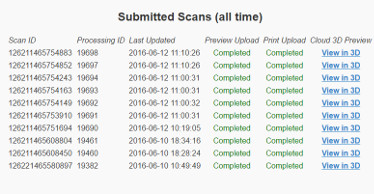
Step 5: Review Test Scans
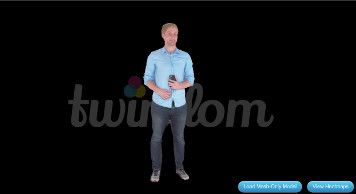
Once uploaded, about 10 minutes later, your preview photosets are processed into 3D models - and you can see them in your Twinstant Manager with a “View in 3D” link.
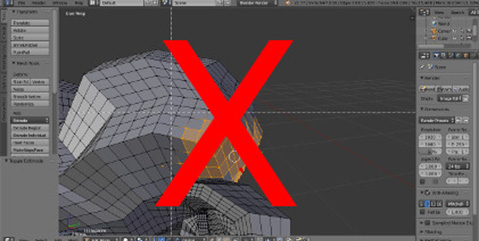
You click the link and review the 3D model in an in-browser viewer - and you check to ensure that colors look good and that there are no major issues with geometry by using the “Mesh Only Mode”.
The scans look good - you’re ready to start scanning customers!
Reference: 4 Ways to Get High Quality 3D Portraits from your Full Body 3D Scanner (FAQ)
Step 5: Attracting Customers

The venue opens to the public and you start working directly with customers - lots of people walk up to your booth, and many of them seem to ask a lot of questions! You refer to your documentation (the User’s Guide) to answer the questions you aren’t sure about, but are able to answer most of them off-the-cuff - and you show them the sample prints that you have placed on a display table to explain the product.
After a few moments explaining the product, you convince them to take a 3D photograph (which isn’t hard to do at all, especially since the capture takes a fraction of a second).
Reference: Overview of Hybrid Full-Body 3D Scanners (Blog)
Step 6: Scanning Customers
You ask the customer for their first name, last name, e-mail address, and phone number, and input them into your Twinstant Manager interface to start a session. When you submit the form, an account is created for them in your Twindom Manager CRM (part of the Twindom Cloud Platform) so you can later look them up and see which 3D photographs they have taken with you.
You choose the number of people in the scan (in this case it is a couple), and then click the “Run a Capture” button on your interface. A countdown appears, then the system flashes the lights, then the projectors, and the capture is complete! Because the process was so easy, you have some fun with the customers and run a couple more captures so you’re sure they will have one they love.
You show the customers the galleries of images that the system took (89 images for each capture, both with projection and without), and ask them which scans they would like to process - or you just process them all so they will have options.
Reference: Capture App (FAQ)
Step 7: Making a Sale
Some customers will want to wait to see the 3D preview, which will take ~10 minutes to process; however, these customers are ready to order based on the sample prints you have at the booth and the galleries of images you showed them during the capture process.
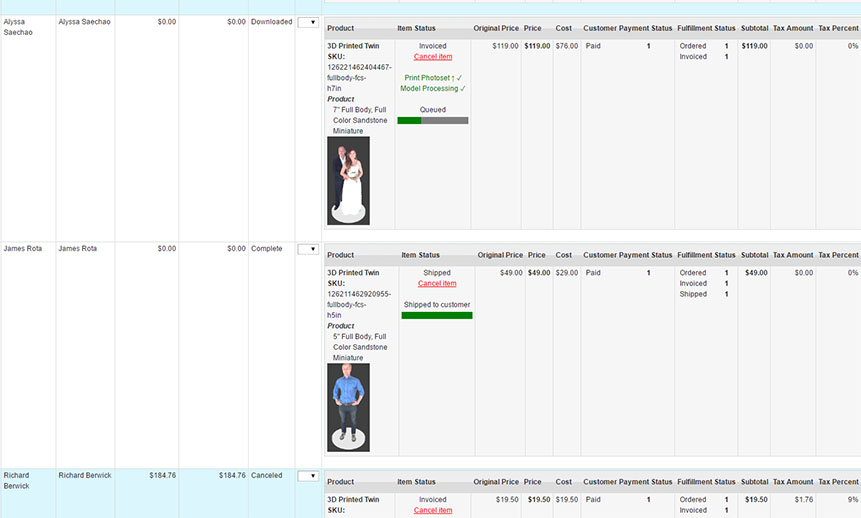
To place an order, you pull up the Twindom Manager interface (part of the Twindom Cloud Platform), and you place an order for them, filling in the scan ID from the scans they want to order (shown on the scanner under “Submitted Scans”), their shipping details, the method they wish to have the prints shipped by, and their payment information (a credit card).
Since you’ve set up your Stripe account and linked it to your Twindom Manager, you can charge your customers directly through the Twindom Manager when placing an order - and the funds go directly into YOUR account. No waiting for payments! If you didn’t have your Stripe account set up, you’d likely use paper order forms, then charge your customers using Square (or another credit card processor), then input your orders later when you are back at the office. Also, everything is in your currency - any currency Stripe supports is a currency you can use on the Twindom Cloud Platform to charge your customers.
As soon as the order is placed and you see a confirmation, you thank the customers, send them an e-mail receipt by checking the box at the bottom of the order page, and attend to the next customer who is now in line to get scanned (yes, you have a line of about 10 people now).
The rest of your day is packed - you scan people back to back and are genuinely exhausted by the end of the day - but you’ve captured a ton of scans and made a great number of sales.
Reference: 3D Photography Business (FAQ)
Step 8: Following Up
Before you leave the venue, you follow up with customers who came by during the day that haven’t made a purchase yet by sending them an e-mail from the Twindom Manager interface.
As soon as their 3D preview was processed by the Twindom Cloud Platform, they received an automated welcome e-mail that said “Your 3D Photograph Is Ready To View And Share” - but it never hurts to e-mail and personally check in with those clients who seemed to be interested in purchasing quickly.
Thanks to the automated e-mail and your follow up, your customers go through the purchase process on the Twindom Cloud Platform, but all throughout the process see your brand, as the entire platform and all communication is whitelabeled with your logo, company name, and contact information.
Some of them love their scans so much that they share them on social media using the tools integrated into the e-mail and platform!
Step 9: Packing Up
You follow the User’s Guide and videos and disassemble the system, then bring it back to your car and load it in, all of which takes about 45 minutes.
On the drive back, you stop to grab a bite to eat, then when you get back to the office, you unload the system, plug in the Capture Laptop, connect it to the office wifi, and turn on the “Idle Upload” feature on the Twinstant Manager dashboard to upload all of the print-quality photosets for the scans that you ran during the day. These photosets are ~130mb each, so you’re glad that you have a 20mb upload speed connection at the office so they’ll upload overnight.
You successfully scanned around 200 people and made about $4,500 in sales - and you know that more of those scans will convert over the coming days as people log in and review their 3D previews.
Congratulations on a successful event - now all you have to do is release the print orders and wait for them to be fulfilled by Twindom!
Step 10: Managing 3D Print Orders
Now that you’re back at the office and refreshed from a good night’s sleep, you’re ready to deal with managing the orders that were placed at the event.
First, you check to ensure that all of the print-quality photosets have uploaded. Since you had 200 of them, there are still a few remaining - that’s okay though, as they will upload once you leave the laptop idle again. As these are used in the print-production process, you know they need to be uploaded within 1-2 days of a print order being placed to avoid delaying the fulfillment of the print order.
Next, you go through the e-mails you received overnight from customers who placed orders at home (you get notification e-mails when your customers make a purchase), and you click the “release” links to make payments to Twindom for the fulfillment cost for each order. Once the fulfillment cost is paid, the order goes to a “Untouched” status and is submitted for processing, touch-up, and printing at the specific size and in the specific material you chose (and whether a base should be added or not).
Since you set up your logo in the Twindom Manager and enabled it, all of your print orders will have your logo on the bottom of all models that are ordered with a base - a free feature of the Twindom Cloud Platform.
Reference: Twindom Cloud Platform (FAQ)
Step 11: Twindom Touches Up Your Orders
Over the next few days, Twindom prepares the 3D model files for touch-up, then processes them through a network of artists that are heavily trained to resolve 3D model issues, including geometry and texture problems. Normally, you would have to do this yourself, or hire someone to do this - which is extremely expensive - but because Twindom offers this as a part of the Twindom Cloud Platform, you can rest assured that they’ll take care of it for you as a part of the print fulfillment cost you’ve already paid.
Without this process, models have artifacts that cause disappointment - usually discoloration and/or small bumps that should not be present on the print, as they were not present in real life but were created by the photogrammetry processing pipeline that processed the 3D model from the photographs. Since you had comments on your models that you put in when you placed them (or released them), the artists review those comments and do their best to incorporate your requests into the touch-up process.
Once the touch-up is complete, the file is sent to the next stage - printing.
Step 12: Twindom Prints Your Orders
Once the touch-ups are complete for an order, the parts are submitted to a Twindom-Approved 3D Print Partner who will print the parts on a ProJet 660Pro (or another printer if you’ve chosen a material other than full-color sandstone).
These partners are located all over the world, and the partner that the print is sent to is determined by which partner will minimize lead time to get the parts to you and/or your customers. In most cases, this will be the print partner that is geographically closest to you/your customers.
All Twindom-Approved 3D Print Partners follow a set of quality standards that Twindom has set, and all have the same equipment to be able to provide consistent quality.
Without this network of Twindom-Approved 3D Print Partners, you would have to find a local partner yourself and likely pay a significantly higher rate for printing - or spend a very, very large amount of time and money in learning how to use the printers and handling the issues that running them presents.
Reference: 3D Printing (FAQ)
Reference: International Considerations (FAQ)


Step 13: Twindom Fulfills Your Orders
Once a model is prepared, touched-up, hollowed, post-processed, and printed, the Twindom-Approved 3D Print Partner packs the order and ships it to your customer (or you, if you requested bulk shipping) in tissue paper, bubble wrap, and sturdy cardboard boxes.
If it is shipped to your customer, it arrives in a box with no identifiable company name on it (whitelabeled) so as to avoid confusion and includes either a packing slip with no prices or no documentation at all, depending on where it came from and where it was shipped to.
The tracking number for the shipping service used is added to your Twindom Manager, and the order is marked as “complete”. Both you and your customer receive shipment confirmation e-mails.
Step 14: Repeat!
For each event you do, you repeat the above process, changing it slightly each time.
You learn more each time, changing your print prices, setting up new tax rates based on new locations that you go to, and review your earnings using the Accounting Report tool within the Twindom Manager interface on the Twindom Cloud Platform.
Any time you have a question, you e-mail Twindom Support and get a reply promptly with a simple solution.
You’re off to the races - and things are going great!
Now you’re thinking about setting up a semi-permanent location for the holidays…
Reference: Support and Warranty (FAQ)
Reference: General Information (FAQ)
Reference: 3 Marketing Ideas for your 3D Selfie Business (Blog)